Drawing Arrow Shapes
Introductions
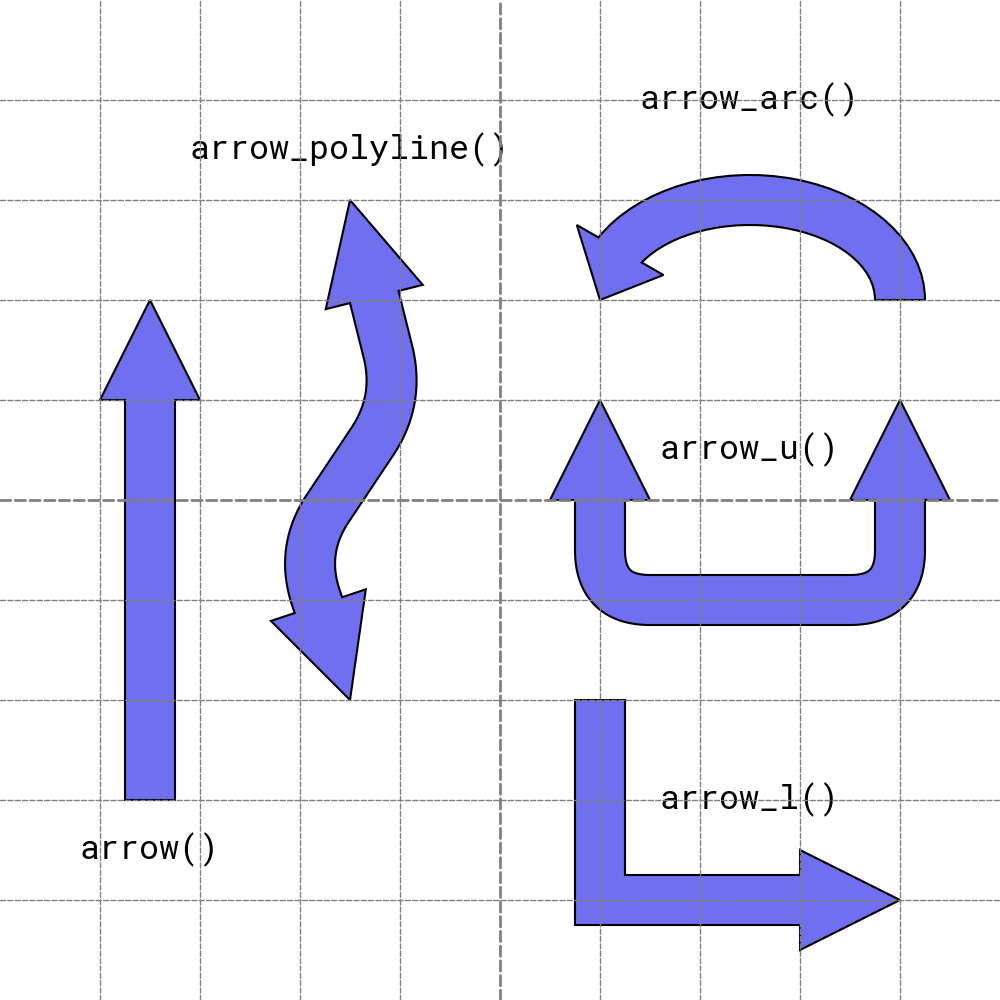
Arrow Shapes draw thick arrow. There are these functios
arrow(): Draw arrow from xy1 to xy2.arrow_polyline: Draw arrow which passes list of xys.arrow_l: Draw L shape arrow from top left to right bottom.arrow_u: Draw U shape arrow from top left to right top.arrow_arc: Draw ellipse arc arrow from start angle to end angle.
Here are arrow examples:
arrow()
Name of Arguments
All arrow functions have similar argument namings. Understanding how to specify arrow size might be useful.
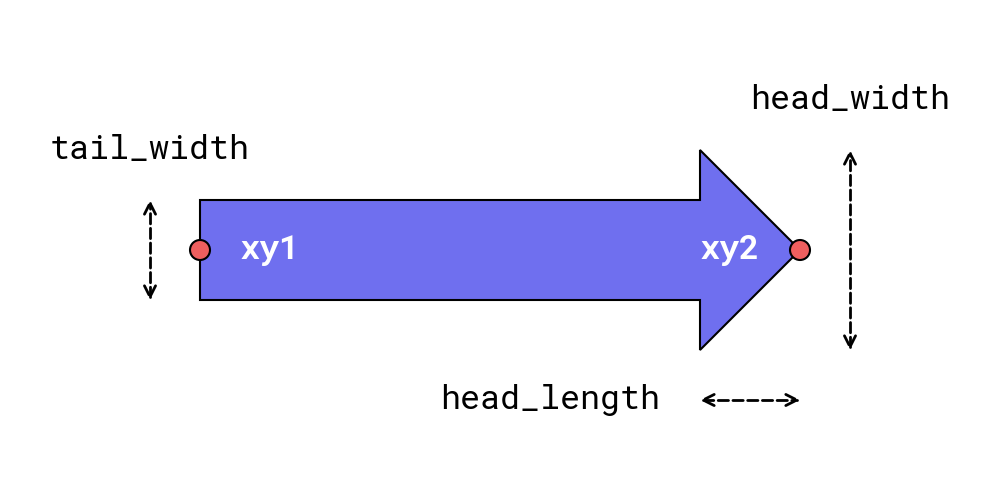
Arrow size arguments.
xymeans coordinate of arrow.xy1andxy2,xysare used.tail_width: Tail width of arrowhead_width: Head width of arrowhead_length: Head length of arrow
You can specify arrow direction via arg head.
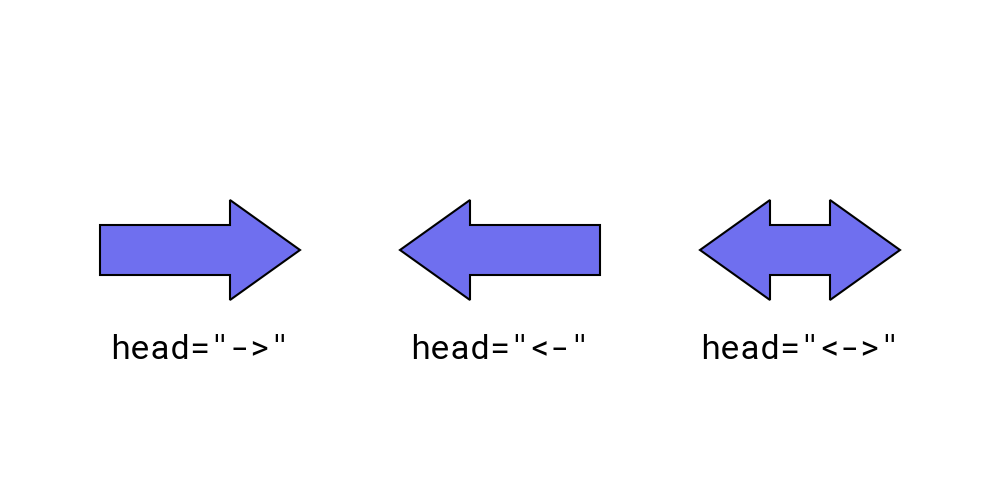
Arrow size arguments.
->: Draw arrow head at end of xy<-: Draw arrow head at start of xy<->: Draw arrow head at both start and end of xy
Functions
arrow()
The arrow() function draws an arrow shape between two points defined by xy1 (start point) and xy2 (end point).
You can customize the arrow’s tail and head sizes and styles.
This function accepts the following arguments:
xy1: Start point coordinates (x1, y1)
xy2: End point coordinates (x2, y2)
tail_width: Width of the arrow’s tail (not the head)
head_width: Width of the arrow’s head
head_length: Length of the arrow’s head
head (optional): Style of the arrow’s head (
"->","<-","<->"for different configurations)style (optional): Style of the arrow
text (optional): Centered text
textstyle (optional): Style of the centered text
Let’s explore an example:
 1from drawlib.apis import *
 2
 3dtheme.change_default_fonts(FontRoboto.MONO_LIGHT, FontRoboto.MONO_REGULAR, FontRoboto.MONO_BOLD)
 4config(width=100, height=50, grid_only=True)
 5
 6arrow((5, 25), (45, 25), tail_width=10, head_width=20, head_length=10)
 7arrow(
 8    (75, 5),
 9    (75, 45),
10    tail_width=10,
11    head_width=20,
12    head_length=10,
13    head="<->",
14    text="arrow()",
15)
16save()
Here is an example output:
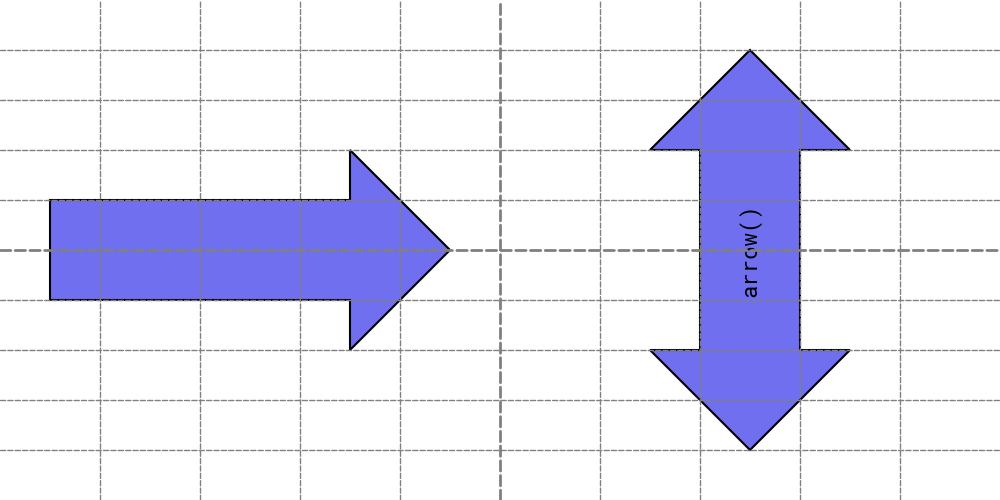
arrow()
In the arrow() function, the angle of the arrow is determined automatically by its start and end points.
The function does not use the alignment attributes (halign and valign) from ShapeStyle.
arrow_polyline
The arrow_polyline function draws an arrow which passes xys points.
It supports rounded edges.
It doesn’t support having text inside.
xys: List of arrow coordinates.
tail_width: Width of the arrow’s tail (not the head)
head_width: Width of the arrow’s head
head_length: Length of the arrow’s head
head (optional): Style of the arrow’s head (
"->","<-","<->"for different configurations)r (optional): R of arrow line
style (optional): Style of the arrow
text (optional): Centered text
textstyle (optional): Style of the centered text
Let’s explore an example:
 1from drawlib.apis import *
 2
 3dtheme.apply_official_theme("essentials")
 4dtheme.change_default_fonts(FontRoboto.MONO_LIGHT, FontRoboto.MONO_REGULAR, FontRoboto.MONO_BOLD)
 5config(width=100, height=50, grid=True)
 6arrow_polyline(
 7    [(25, 5), (15, 25), (25, 45)],
 8    tail_width=5,
 9    head_width=10,
10    head_length=5,
11)
12
13arrow_polyline(
14    [(50, 5), (40, 25), (50, 45)],
15    tail_width=5,
16    head_width=10,
17    head_length=5,
18)
19lines([(50, 5), (40, 25), (50, 45)], style="white_dashed")
20for dot in [(50, 5), (40, 25), (50, 45)]:
21    circle(dot, radius=1, style="red_flat")
22
23arrow_polyline(
24    [(75, 5), (85, 25), (75, 45)],
25    tail_width=5,
26    head_width=10,
27    head_length=5,
28    r=5,
29    head="<->",
30)
31lines_curved([(75, 5), (85, 25), (75, 45)], r=5, style="white_dashed")
32for dot in [(75, 5), (85, 25), (75, 45)]:
33    circle(dot, radius=1, style="red_flat")
34
35save()
Here is an example output:
arrow_polyline()
arrow_l
The arrow_l function is syntax sugar of arrow_polyline.
It draw “L” style arrow easily by specifying width and height and angle.
xys: Center of arrow shape.
width: width of arrow
height: height of arrow
tail_width: Width of the arrow’s tail (not the head)
head_width: Width of the arrow’s head
head_length: Length of the arrow’s head
head (optional): Style of the arrow’s head (
"->","<-","<->"for different configurations)r (optional): R of arrow line
angle (optional): Angle of arrow
style (optional): Style of the arrow
Let’s explore an example:
 1from drawlib.apis import *
 2
 3dtheme.apply_official_theme("essentials")
 4dtheme.change_default_fonts(FontRoboto.MONO_LIGHT, FontRoboto.MONO_REGULAR, FontRoboto.MONO_BOLD)
 5
 6config(width=100, height=50, grid=True)
 7arrow_l(
 8    xy=(15, 25),
 9    width=20,
10    height=30,
11    tail_width=3,
12    head_width=6,
13    head_length=3,
14)
15
16arrow_l(
17    xy=(40, 25),
18    width=20,
19    height=30,
20    tail_width=3,
21    head_width=6,
22    head_length=3,
23    style="white",
24)
25lines([(30, 40), (30, 10), (50, 10)], style="dashed")
26for dot in [(30, 40), (30, 10), (50, 10)]:
27    circle(dot, radius=0.7, style="red_flat")
28
29circle((40, 25), radius=0.7, style="blue_flat")
30line((30, 25), (50, 25), style="blue_dashed", arrowhead="<->")
31text((47.5, 27.5), "width", style="blue")
32line((40, 40), (40, 10), style="blue_dashed", arrowhead="<->")
33text((40, 42.5), "height", style="blue")
34
35arrow_l(
36    xy=(75, 10),
37    width=10,
38    height=15,
39    tail_width=3,
40    head_width=6,
41    head_length=3,
42    angle=90,
43    head="<->",
44)
45text((70, 10), "angle=90")
46
47arrow_l(
48    xy=(75, 25),
49    width=10,
50    height=15,
51    tail_width=3,
52    head_width=6,
53    head_length=3,
54    angle=180,
55    head="<-",
56)
57text((70, 25), "angle=180")
58
59arrow_l(
60    xy=(75, 40),
61    width=10,
62    height=15,
63    tail_width=3,
64    head_width=6,
65    head_length=3,
66    angle=270,
67    head="<-",
68)
69text((80, 40), "angle=270")
70
71save()
Here is an example output:
arrow_l()
You need to change angle and direction of arrow head for drawing various style of L arrow.
arrow_u
The arrow_u function is syntax sugar of arrow_polyline.
It draw “U” style arrow easily by specifying width and height and angle.
xy: Center of arrow shape.
width: width of arrow
height: height of arrow
tail_width: Width of the arrow’s tail (not the head)
head_width: Width of the arrow’s head
head_length: Length of the arrow’s head
head (optional): Style of the arrow’s head (
"->","<-","<->"for different configurations)r (optional): R of arrow line
angle (optional): Angle of arrow
style (optional): Style of the arrow
Let’s explore an example:
 1from drawlib.apis import *
 2
 3dtheme.apply_official_theme("essentials")
 4dtheme.change_default_fonts(FontRoboto.MONO_LIGHT, FontRoboto.MONO_REGULAR, FontRoboto.MONO_BOLD)
 5config(width=100, height=50, grid=True)
 6
 7arrow_u(
 8    xy=(15, 25),
 9    width=15,
10    height=30,
11    tail_width=3,
12    head_width=6,
13    head_length=3,
14)
15
16arrow_u(
17    xy=(40, 25),
18    width=15,
19    height=30,
20    tail_width=3,
21    head_width=6,
22    head_length=3,
23    style="white",
24)
25lines([(32.5, 40), (32.5, 10), (47.5, 10), (47.5, 40)], style="dashed")
26for dot in [(32.5, 40), (32.5, 10), (47.5, 10), (47.5, 40)]:
27    circle(dot, radius=0.7, style="red_flat")
28
29circle((40, 25), radius=1, style="blue_flat")
30line((32.5, 25), (47.5, 25), style="blue_dashed", arrowhead="<->")
31text((45, 27.5), "width", style="blue")
32line((40, 40), (40, 10), style="blue_dashed", arrowhead="<->")
33text((40, 42.5), "height", style="blue")
34
35arrow_u(
36    xy=(75, 10),
37    width=8,
38    height=12,
39    tail_width=3,
40    head_width=6,
41    head_length=3,
42    angle=90,
43    head="<->",
44)
45text((70, 10), "angle=90")
46
47arrow_u(
48    xy=(75, 25),
49    width=8,
50    height=12,
51    tail_width=3,
52    head_width=6,
53    head_length=3,
54    angle=180,
55    head="<-",
56)
57text((70, 25), "angle=180")
58
59arrow_u(
60    xy=(75, 40),
61    width=8,
62    height=12,
63    tail_width=3,
64    head_width=6,
65    head_length=3,
66    angle=270,
67    head="<-",
68)
69text((80, 40), "angle=270")
70
71save()
Here is an example output:
arrow_u()
You need to change angle and direction of arrow head for drawing various style of L arrow.
arrow_arc
The arrow_arc function draw arc on ellipse and circle(when width and height are same).
It specify ellipse width and height.
And also, you can specify where arrow start and end via angle_start and angle_end.
Please take care, length of head is specified by head_angle.
head_angle=N means drawing head within N degree.
xy: Center of arrow shape.
width: width of ellipse
height: height of ellipse
tail_width: Width of the arrow’s tail (not the head)
head_width: Width of the arrow’s head
head_angle: Length of the arrow’s head by degree
head (optional): Style of the arrow’s head (
"->","<-","<->"for different configurations)angle_start (optional): Where the arrow start. default is 0.
angle_end (optional): Where the arrow end. default is 360.
angle (optional): Angle of arrow
style (optional): Style of the arrow
Let’s explore an example:
 1from drawlib.apis import *
 2
 3dtheme.apply_official_theme("essentials")
 4dtheme.change_default_fonts(FontRoboto.MONO_LIGHT, FontRoboto.MONO_REGULAR, FontRoboto.MONO_BOLD)
 5config(width=100, height=50, grid=True)
 6
 7arrow_arc(
 8    xy=(15, 25),
 9    width=15,
10    height=15,
11    tail_width=3,
12    head_width=6,
13    head_angle=20,
14    angle_start=20,
15    angle_end=340,
16)
17
18arrow_arc(
19    xy=(40, 25),
20    width=15,
21    height=15,
22    tail_width=3,
23    head_width=6,
24    head_angle=20,
25    angle_start=20,
26    angle_end=340,
27    style="white",
28)
29arc(
30    xy=(40, 25),
31    width=15,
32    height=15,
33    # angle_start=20,
34    # angle_end=340,
35    style="dashed",
36)
37circle((40, 25), radius=1, style="blue_flat")
38line((32.5, 25), (47.5, 25), style="blue_dashed", arrowhead="<->")
39text((53, 25), "width", style="blue")
40line((40, 17.5), (40, 32.5), style="blue_dashed", arrowhead="<->")
41text((40, 37.5), "height", style="blue")
42
43for dot in [(47, 27.5), (47, 22.5)]:
44    circle(dot, radius=0.7, style="red_flat")
45
46text((57.5, 29), "angle_start", style="red")
47text((57.5, 21), "angle_end", style="red")
48
49text((32.5, 7.5), 'The arrow is drawn counterclockwise.\nTo draw a clockwise arrow, specify head="<-".')
50
51arrow_arc(
52    xy=(80, 12.5),
53    width=25,
54    height=15,
55    tail_width=3,
56    head_width=6,
57    head_angle=20,
58    angle_start=225,
59    angle_end=135,
60    head="<->",
61)
62text((72.5, 12.5), "width=25, height=15")
63
64arc(xy=(80, 37.5), width=25, height=15, angle=45, style="dashed")
65arrow_arc(
66    xy=(80, 37.5),
67    width=25,
68    height=15,
69    tail_width=3,
70    head_width=6,
71    head_angle=20,
72    angle_start=90,
73    angle_end=270,
74    angle=45,
75    head="<-",
76)
77text((82.5, 40), 'angle=45\nhead="<-"')
78
79save()
Here is an example output:
arrow_arc()
Please remember, arrow is always drawn from angle_start to angle_end counterclockwise.
If you want to draw clockwise arrow, please specify it via head.